Since there are so many security issues arising in recent years, WordPress users have started to find the ultimate ways to shield their precious content. Password is one of the top choices that most users put their belief on.
Not coincidentally, several prestigious companies use passwords as a primary method to protect their products and offer them as a major tool for their customers to secure personal information online. With ordinary WordPress site owners, there’s nothing more important than the content uploaded on websites.
No matter whether you own a personal blog or an online store, some specific pages or posts tend to be more exclusive and to be served for certain types of visitors only. But if you set a password to protect them, you need to ensure the protection won’t conflict with the applied theme or page builders. Or else, it might bring the opposite effects.
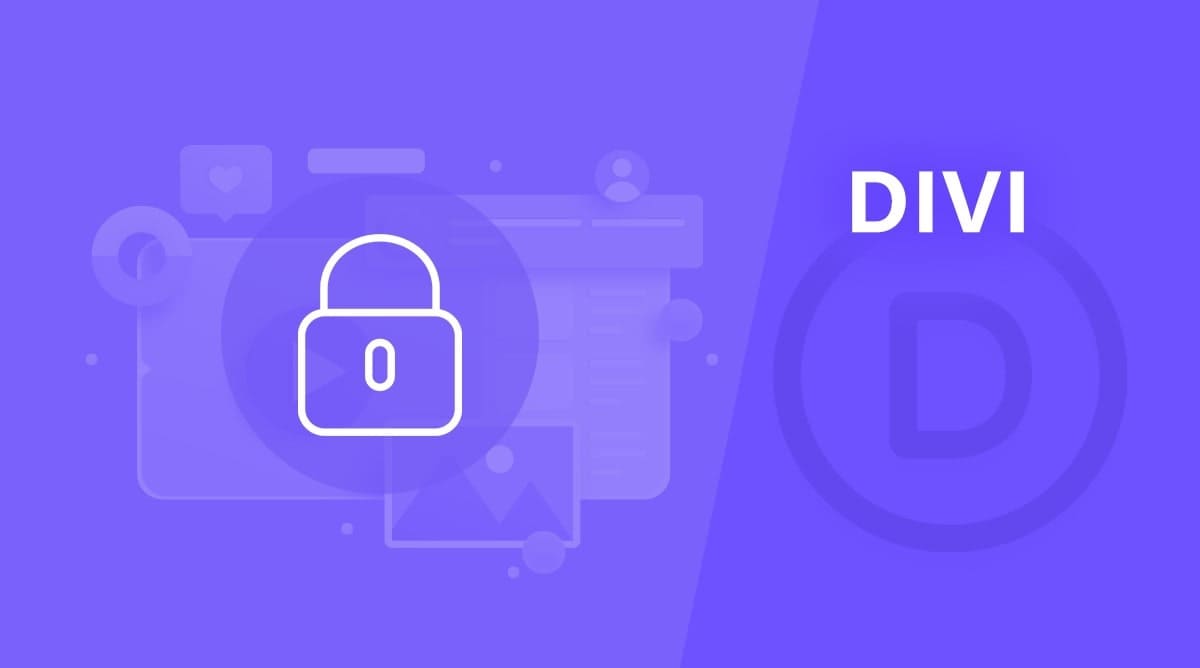
Rather than being a professional website, it could show up as a messy one. Hence, make sure you’re using reliable page builders which are compatible well with other essential protection plugins. The top page builders in the WordPress community that you should know including Divi, Elementor, or Beaver Builder.
To narrow down the scheme of the problem, we specialize this article to provide useful tips for those of you who are using Divi to build your websites. You will get detailed and step-and-step instructions on how to password protect pages, sections, and even categories effortlessly. But before striving to the guidelines, we should discuss how powerful Divi is to build a beautiful WordPress site.
Let’s get started!
- Get to know Divi Builder
- How to Password Protect a Page in WordPress without using Plugin
- How to Password Protect Certain Content Sections
- Using Password to Unlock Multiple Pages
Get to Know Divi Builder
Appearing at one of the best page builders for WordPress sites, Divi offers two forms, including “Back-end Builder” and the front-end “Visual Builder”. Both interfaces let you design the same types of websites under the same settings.
With the builder, you can add a drag-and-drop content editor to any WordPress theme. This feature partly explains why more than 750 thousand users choose Divi for their site design.
The visual builder gives users a chance to edit their page in real-time. In other words, if you are making changes on a page in the back-end, it’s really easy for you to switch to the visual builder with a single click.
You can also create a large group of content and add it to your page with ease since its most basic building blocks used in designing layouts are sections. You have Regular, Specialty, and Full Width available. The first one is used for rows and columns and the last helps expand the entire width of the screen. The Specialty, meanwhile, supports advanced sidebar layouts.
You might be surprised how popular Divi builder is when typing Divi in plugin search on WordPress.org repository. You can find over 500 plugins related to this page builder that has the word “Divi” in their name.
How to Password Protect a Page in WordPress without Using Plugin
If you only have a couple of posts or pages to be protected, using the WordPress default feature may be adequate for your demands. With several primary useful features which are always available for users to make use of, WordPress has supremacy over other CMSs on the market.
In your admin dashboard, open the page or post that you want to password-protect. On the right side, there’s a Publish section. Look for the Visibility option with the eye icon, and hit Edit.
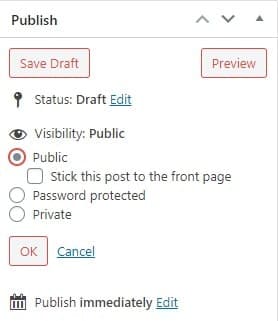
There will be three options for you to set the visibility of a post. It could be public, private, or password-protected. The public option enables visitors to search for and read your content. The private, meanwhile, allows admin to access the page or post only.
In case you want to create a password to lock that certain content, simply check on the Password Protected option.
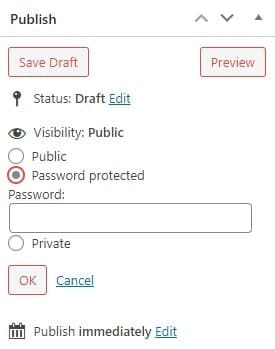
The password box will appear right below the option in which you can input your desired password. Your password should meet a few requirements of a strong password standard that make it work more efficiently. It should contain more than 8 characters with numbers, letters, and special symbols. If you are still in the fog, take a look at these 4 tips to strengthen your password.
Once done, click OK. Your post is covered by a password form generated by WordPress now. Only users getting the correct password are able to unlock and view the content.
This simple method assists you in protecting your pages and posts with ease. At least, with the password shield, visitors can understand that other than regular posts, you’re also offering premium content restricted to special users such as members or paid customers.
How to Password Protect Certain Content Sections in Divi
As mentioned, Divi comes as a popular page builder plugin among WordPress users thanks to its drag-and-drop feature facilitating you to build pages right in the front-end. Unfortunately, neither Divi nor WordPress’s built-in settings support password-protecting content sections.
So Password Protect WordPress (PPWP) Pro plugin comes as a savior. The plugin primarily enables you to password protect pages, posts, custom post types, categories, and partial content on your website.
Unlike other plugins which force you to go to individual posts to see passwords, PPWP allows you to control all your passwords of a page or post in a management popup right in the Pages or Posts section. You can decide how many passwords can be applied for each post or when they will expire within seconds.
When having the plugin installed on your WordPress site, you don’t need to spend much time thinking which password is strong enough to secure your content. It will automatically generate well-defended passwords to make sure brute force attacks or any other password hacks couldn’t break through easily.
Back to your WordPress admin dashboard and follow these 4 steps to get started with the plugin.
1. Download the Password Protect WordPress Pro plugin
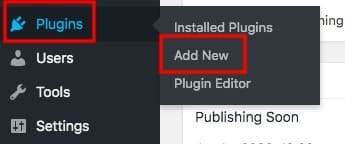
2. Go to Plugins and choose Add New then click Upload Plugin
3. Choose the Zip file you’ve just downloaded
4. Look for Password Protect WordPress Pro in the list of installed plugins and activate it
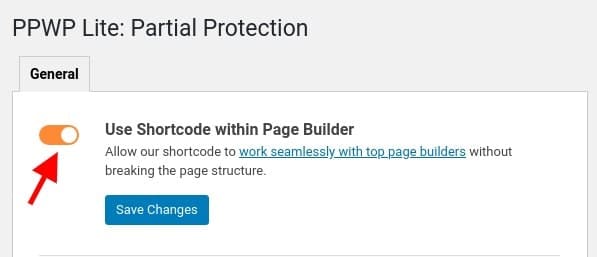
Navigate to the Password Protect WordPress settings page on your WordPress navigation menu and open the Partial Protection in the submenu. Enabling Use Shortcode within Page Builder feature means the plugin is now able to cooperate with Divi to add a shortcode password for your content without breaking the page structure.
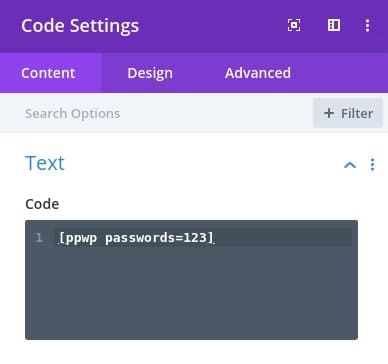
Open the post or page containing sections you want to protect. After that wrap the content you desire to hide from certain users with the plugin’s shortcode. It includes [ppwp passwords=abc,123] placed at the top and [/ppwp] at the end of the section.

“abc” and “123” are the example passwords that you create. It’s possible for you to add multiple passwords for protected content, and separate them with a comma.
Now you need to interpret that shortcode to the Module by using Code one. That will let the partial password code be inserted into your page.

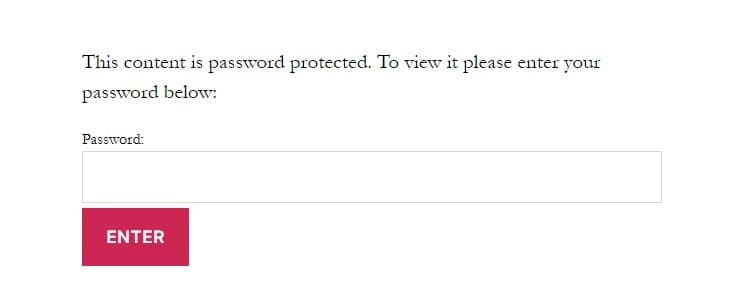
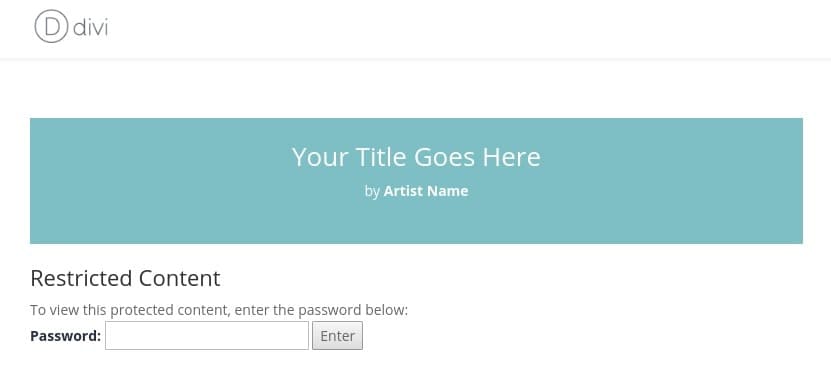
Once published, the section wrapped by the shortcode will be hidden behind the password form. Here is how your private content section looks after being protected:
Using a Password To Lock Multiple Pages
What if the content you intend to protect is not merely a single post or specific section on your page, but tens or hundreds of ones instead? It would be painful and time-consuming to go through it one by one and protect it manually, not even mentioning the process of thinking of a password for each of them.
Luckily, Password Protect WordPress can save you in two powerful ways. You can grab those pages and posts into a group, then protect that group with just a single password. Or divide your content or WooCommerce products into categories, and shield them seamlessly as well.
Group Protection
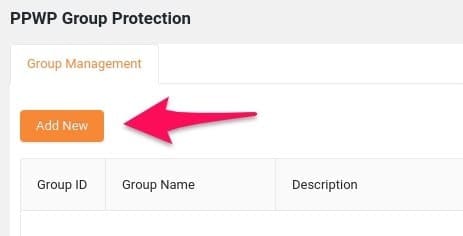
Password Protect WordPress offers the PPWP Group Protection extension to assist you in creating groups of pages and posts and secure them effortlessly.
After installing and activating PPWP Group Protection successfully, open the Password Protect WordPress and switch to the Groups section. Click on the Add New button to create a new group.
Give your group a name, and add a description if needed. In the Content section, there’s a drop-down menu for you to pick what post types to put in the group. It could be posts, pages, products, or a mix of three.
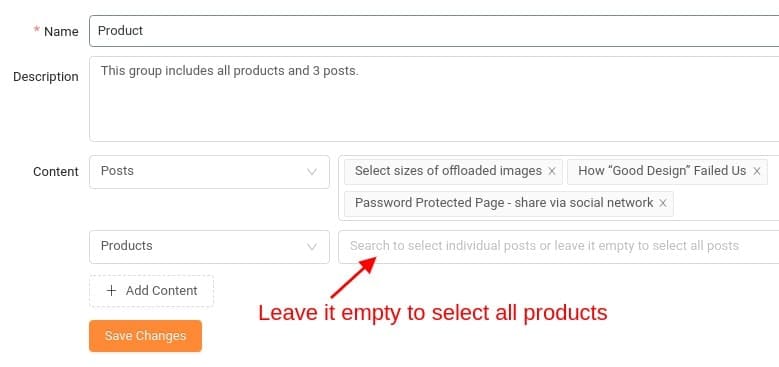
Once done, hit Save Changes and the group is generated immediately. Visit PPWP Group Protection settings and click on Manage to edit the group’s setting. Switch to Add New Password tab to input a password for the group.
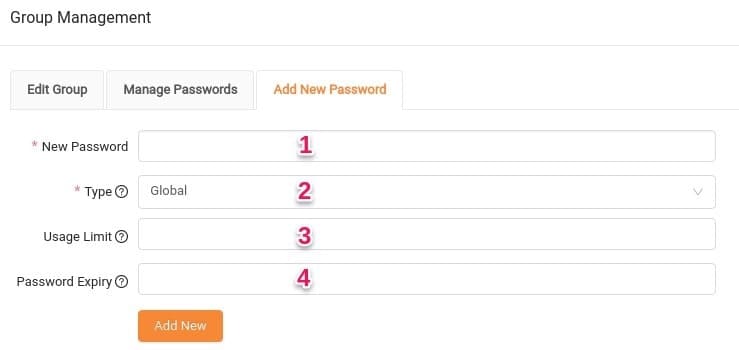
1. Add a strong password, and use it to unlock all the involved elements.
2. Type indicates which user roles can use the password to access the protected content. In which Global means anyone on the Internet, while Roles contains a list of all possible roles you want to grant access to. For example, members subscribers, or customers
3. Usage Limit allows you to set how many times users are able to enter the password to unlock the group’s items. Once the password expires, nobody can use it to unlock the private content.
4. Password Expiry refers to where you set the password expiration date. After the given time, the password will expire automatically.
It doesn’t matter that those posts, pages, or products are under different topics and irrelevant. As long as they are in the same group, users can use the group password to unlock them easily.
Noticeably, users are authorized to enter the password once and unlock all the protected content. They don’t have to keep inputting passwords every time they plan to open a private in the locked group.
Categories Protection
If you own an online shop or classify your content based on different topics under categories, protecting them by categories will make so much sense.
Categories support you in managing your content wisely, and shielding them with a password will avoid a lot of hassle. It’s simpler for you to remember along with shortening the protection process.
The beauty of this feature shows in its availability even in the Lite version of Password Protect WordPress. Navigate to the Categories page from the dashboard and turn on the Password Protect Categories feature.
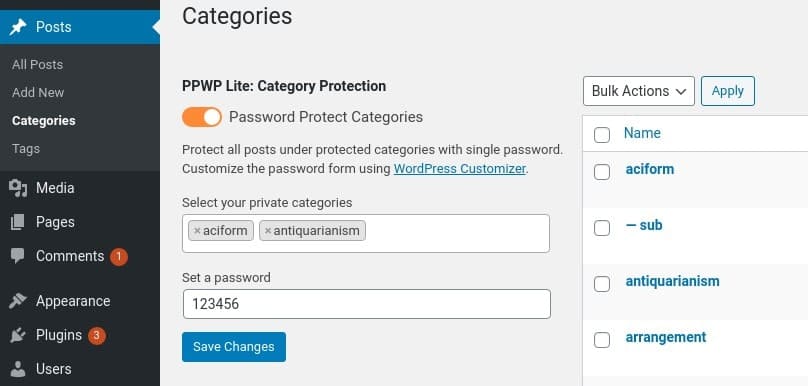
Select which categories you want to make private then set a password for them. Once secured, all the items under those categories will be covered with a password form. If you create new posts or pages belonging to the shielded category later, the content will inherit the password protection as well. Sounds convenient, right?
Make Your Website Attractive and Secure At The Same Time
Divi Builder keeps proving its quality by upgrading exclusive and advanced features to let users unleash their design creativity. The builder is created for those who don’t have any background in coding can build their websites impressively and gorgeously without any complex issues.
While Divi takes good care of your website appearance, Password Protect WordPress humbly stays at the back to shield your content powerfully. Without any interruption or incompatibility in the features, Password Protect WordPress works beautifully with Divi Builder.
The plugin lets you protect pages, posts individually, or in groups and categories. Examine the instructions above and find the most suitable way to protect your content, depending on the scale of the content along with your requirements.