
Often, it can be a problem to manage cloud costs efficiently. As a result, you’re wasting approximately 45% of your cloud spend or more. There are different ways to optimize these expenses in order to apply the released budget in directions that can bring revenue. The most used are:
- Monitoring Usage and Restructuring Instances
- Automating hibernation of temporary workloads
- Shutting down workloads during certain hours
- Selecting cloud or region based on cost
Today we’re going to cover one of the simplest but still highly effective solutions to save money while running cloud development environments. Typically, during these stages of the life cycle, such as development or testing, the environment is not constantly required, such as during the night time or weekends. Spending can easily be noticed in the simple one-week illustration with 5 business days of approximately 10 hours each:
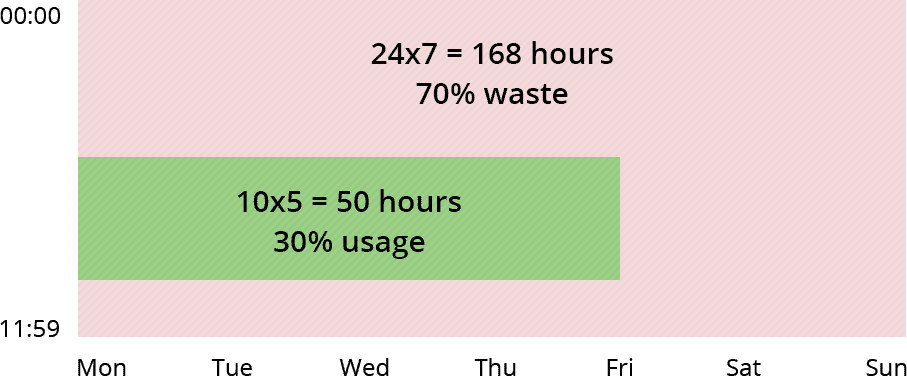
As you see, approximately 70% of the resources are wasted during non-working hours. So it would be a smart decision to stop your environment during such a downtime to cut costs. Obviously, doing this manually is an inefficient way of managing it. So you need to automate the process.
MilesWeb Cloud has an add-on cron-based scheduler that is designed to automate stop and start operations for any environment on the cloud platform. Although extremely simple in configuration, it allows for considerable savings, especially when working with multiple environments. And to help you with this, we’ll take a look at the steps that are necessary to install and manage this add-on and a number of possible configurations for the most common use cases with this solution. So let’s go!
Install Hibernation Scheduler
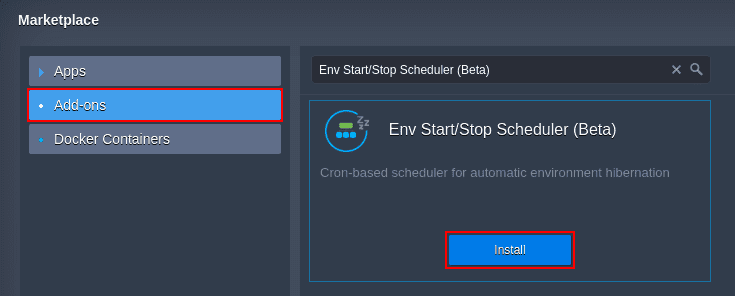
The nv Start/Stop Scheduler solution is added as one of the standard add-ons in the MilesWeb Marketplace. Therefore, its installation is a simple and automated process.
1. Log in to the control panel and click the Marketplace button in the top pane.

2. Switch to the Add-ons tab and locate the Env Start/Stop Scheduler solution. Hover over it and click the Install button.
3. Within the open frame, you need to configure and confirm the installation.
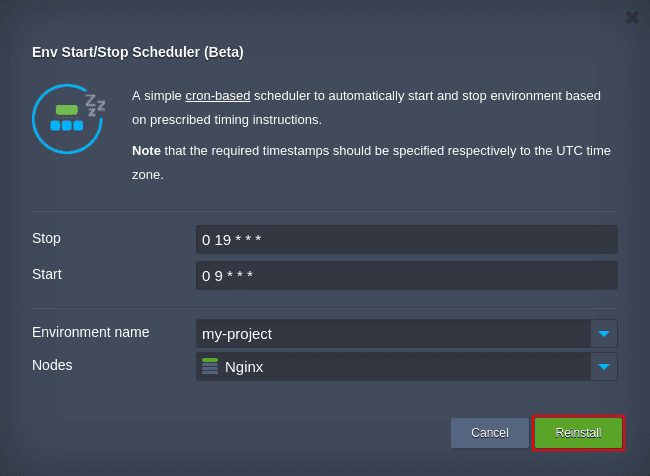
Please provide the following information to customize the add-on according to your needs:
- Stop/Start – cron trigger conditions for proper execution of environment operations (5 characters each); you can leave the default values to stop the environment at 7 a.m. and start at 9 a.m. daily, specify your own or leave one of them blank if you do not want to activate it.
Note: The values must be set, respectively, for the UTC time zone.
- Environment name – Target environment that must be managed by the add-in.
- Nodes – Environment layer in which the add-on will be installed; it is automatically obtained by selecting the environment (we recommend leaving this field unchanged).
Note that the Start/Stop scheduler can run on only one layer at a time; otherwise (if it is integrated with several), only the last one installed or reconfigured will be working.
Click Install to add a scheduler.
4. Soon, you’ll see a notification about the operation being completed successfully.

That’s it! The add-on has been installed and is already running, ready to regulate the uptime of the environment based on the specified schedule.
Hibernation Scheduler Management
If you need to adjust the start/stop conditions after installation, you can do so directly through the control panel:
1. Click the Add-ons icon next to the environment layer where the solution was installed.
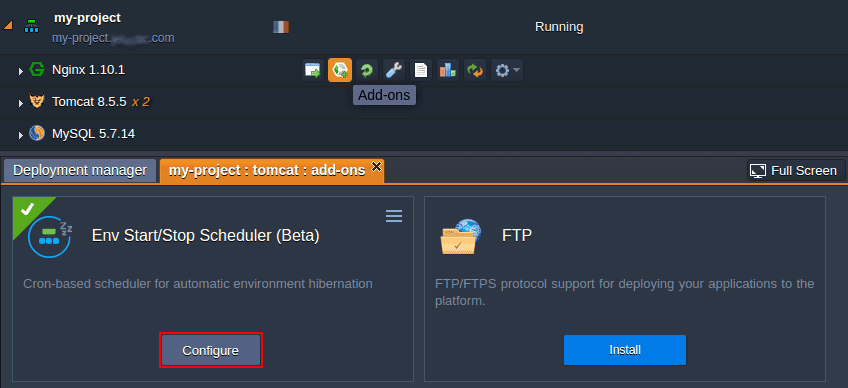
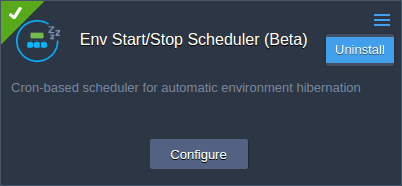
On the open tab, locate the scheduler and select the Configure button.
2. The appropriate frame will be displayed, allowing you to set new values for the Stop and Start triggers (or to disable one of them by cleaning the corresponding field).
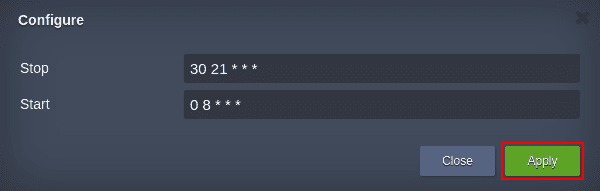
For example, let’s set the time to stop and start at 9:30 a.m. and 8:00 a.m., respectively. Click Apply to use the new add-on settings.
3. When you move the project to production (or you simply do not need this solution), use the menu in the upper-right corner of the scheduler to uninstall it. That way, you ensure the permanent availability of applications to your customers.
Confirm this operation within pop-up, and then the add-on will be removed from your environment.
Common use cases
The syntax of the triggers is very versatile, allowing you to adjust the add-on to your specific needs and intelligently manage the operating time of the environment.
Here are some of the most common use cases that may be useful to you:
- Night time – Stop the environment every day at night (e.g., 7 p.m. at night) and start in the morning (e.g., 9 a.m.).

- Weekends – Stop every Friday night and start Monday morning.

- Night Time + Weekends – Stop at night and start in the morning on weekdays (stopped during weekends).

- Every other day – Stop on odd days of a month and start on even days.

- Holidays – hibernation plan for a specific holiday (e.g. New Year celebration); stop on December 30 and start on the second day of January.

That is all! Now you know how to work with the MilesWeb Cloud Env Start/Stop Scheduler add-on and can use it to organize your environments operating time. Try one of the use cases described above (or provide time to start and stop based on your specific needs) to maximize the resources/funds you save in your test and development environments running on the MilesWeb Cloud.