In this article, you will learn to manually re-install a new copy of WordPress to your hacked site.
Step One: Change Your WordPress Theme
First, log in to your WordPress dashboard at ‘example.com/wp-admin’. After getting logged in, go to Appearance > Themes for changing your theme to the current default theme. If you change your theme now, it will make the further process easier for you.
Step Two: Change Your Passwords
You should always follow the below tips on passwords:
• Never reuse passwords – Many of you use the same password in different places. Never do that. Instead ensure that your passwords are all unique from one another. This is because if one password is compromised, your other logins will stay safe.
• Generate strong passwords – There are many tools to generate a strong password. Make sure your password is 8 characters long and comprises of a mix of numbers and letters.
• Use a password tool – You can secure and generate new passwords with tools such as LastPass and OnePassword.
It is important that you change FTP user password as well as your database user password.
Steps to Change the FTP user password
Updating your wp-config.php file
While changing the database user’s password, it is important to edit your wp-config.php file to implement this new password. You will find the information on editing the wp-config.php file to change the database password at codex.WordPress.org.
In case there are multiple users for your database, ensure that you change the correct user’s password. It is possible to check which database user logs into your database for your WordPress install by going through the wp-config.php file.
Base64 hacks are dangerous and leave a void that hackers can use repeatedly on your site. Make sure you delete that complete section, or better yet, just rebuild the wp-config.php.
Step Three: Take the Hacked Code Offline
1. Log in to your web server using FTP.
2. Search for your domain’s directory (folder) which comprises of your sites’ name. If you open the correct directory, you will see a list of files and directories that begin with “wp-“. There is a possibility that you might have installed WordPress in a subdirectory such as /blog.
3. Rename the directory (folder), in which WordPress is installed. In case it’s your primary directory, rename it ‘example.com_HACKED’. In case it’s in a subdirectory, rename it to ‘example.com/blog_HACKED’.
4. Create a new, empty domain directory and name it with the old directory name.
Step Four: Install a New Copy of (Unhacked) WordPress
Reinstall WordPress in one of the below ways:
• Manually
• Using the One-Click Installer
Steps to Manually Reinstall WordPress
Check the below page for steps to manually reinstall WordPress:
• Installing WordPress
Using wp-clic you can download the core WordPress files:
[server]$ wp core download
Steps to Reinstall WordPress with One-Click Installer
Check this article for installing WordPress with one-click installer.
While removing the current WordPress via the One-Click Installer, just click the Remove from List button. Avoid clicking on Delete all Files or else that will permanently remove your website files.
Step Five: Connect Your Newly Installed WordPress to Your Old Database
It is important to connect the new files you’ve downloaded to your existing database. For this, you need the below information:
• Database name
• Database username
• Database user password
• Hostname
• Table prefix
You will find this information in your previous wp-config.php file:
1. Log in to your server via FTP.
2. Go to your previous hacked directory that you have renamed to example.com_HACKED.
3. Open the wp-config.php file. You’ll see all of the values listed above.
• The table prefix line begins with $table_prefix =.
4. Go to your new WordPress install directory.
5. In that new folder, delete or rename the wp-config.php.
6. Load your site.
You will be asked to select a language:
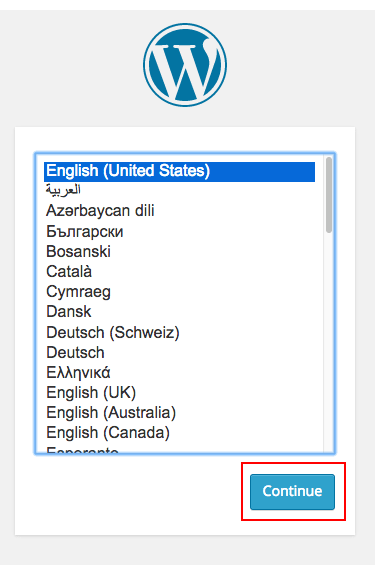
7. Choose your preferred language, and then click on Continue.
The WordPress setup page gets displayed:
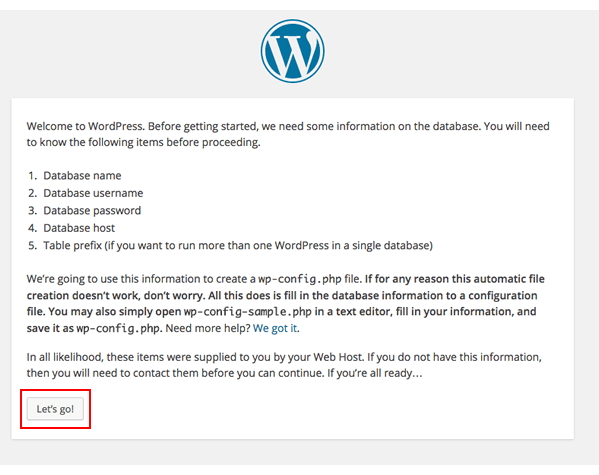
8. Next, click on Let’s go!
You will see the following page that prompts you to enter your credentials:
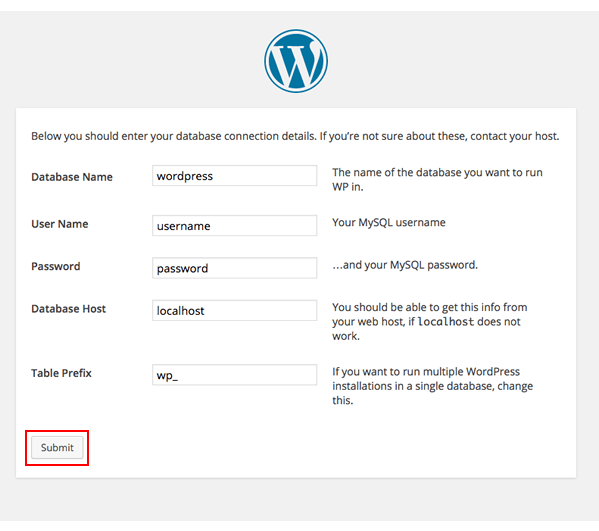
9. Mention the required information, and then click on Submit.
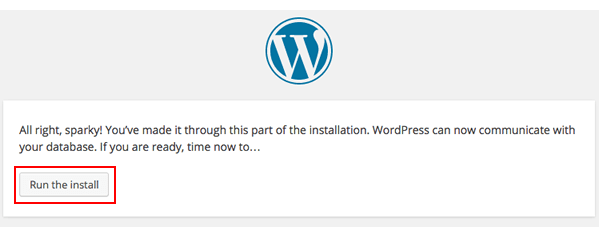
10. Click on Run the install button.
As you already have data, you will get a message signifying that WordPress is already installed. This means that you’ve successfully connected your WordPress installation to your old database:
Step Six: Add Your Previous Content
You will see that you WordPress site is now completely installed and connected to your old database. But, it is won’t be using your former theme, plugins, or previously uploaded images.
In this step you will learn to add all of your previous themes, uploads, and plugins.
Installing Your Previous Theme
WordPress themes can easily get hacked. So, always download and install a new copy of your theme instead of moving the theme files from your old install.
In case you changed your theme to the default theme prior to starting, your site will load your posts, but without using the correct theme.
In case your specific theme isn’t currently installed, it can be installed through the WordPress dashboard. Check the below page for steps to install a different theme:
In case you don’t change the theme to the default theme before starting, your site may load with a blank white page.
This happens as your database is finding for a theme that isn’t installed anymore.
As it isn’t possible to access the WordPress dashboard now, download a copy of your selected theme (usually delivered in a ZIP format). Then upload and install the theme from within the WordPress dashboard. Else you can unzip it on your computer, and then log into your server via FTP account to upload the theme to the themes directory. You will find it in the below folder:
example.com/wp-content/themes
For example, your theme name is /my_theme, it should look as below:
example.com/wp-content/themes/my_theme/
After installing and activating your chosen theme, your site should load normally and you should see your posts.
Copying Your Previous Uploads
You will find your uploads (images and other media) in the old hacked install’s directory. With FTP, copy the contents from the old folder to the new one. For example:
example.com_HACKED/wp-content/uploads
-to-
example.com/wp-content/uploads
Don’t miss to check over the files you are moving and ensure they are all yours. In case mistakenly, you move hacked code into your new install, it will infect your new site. The /uploads directory primarily contains media, so check if the files are ending with extensions that indicate the type of file (.jpg for a JPEG image, for example, or .mp3 for a MP3 audio file). BE VERY CAREFUL ABOUT FILES THAT END WITH .PHP IN THE /uploads DIRECTORY.
Installing Your Former Plugins
Finally, you will need to install the WordPress plugins required for your site. Again, you should install brand-new copies of your plugins, instead of copying over the files from the hacked install.
The plugins can be installed from your new WordPress dashboard. Install the plugins that you know you need and will use. When you eliminate the inactive plugins, a hacker can’t access to your install and this helps WordPress to run faster as well.
Step Seven: Finish Successfully
In case all goes well, your brand-new install of WordPress is connected to your old database that too with all your uploaded content, chosen theme and plugins.


