At MilesWeb we take our customers’ data security very seriously and for that we use professional tools such as the R1Soft that seamlessly integrates with cPanel control panel.
R1Soft Backup (Continuous Data Protection) is a data backup system that is completely different from traditional backups offered by other hosting companies. We offer our customers’ unlimited backup space on external servers for added security.
What customers can benefit from R1Soft Backup?
We offer R1Soft backup absolutely free to all of our clients on our listed products as:
- cPanel Hosting
- Joomla Hosting
- Worpress Hosting
- Magento Hosting
- Drupal Hosting
- MediaWiki Hosting
- OsCommerce Hosting
- Zen Cart Hosting
- LSM Hosting
- PHP BB Hosting
- Tomcat Java Hosting
- Prestashop Hosting
- Moodle Hosting
- Reseller Hosting
Each hosting account hosted on any of our servers gets the advantage of having a restorable copy of data without any intervention on our part. Customers can restore from a file or folder to a database, all email data, just an email or restore entire account in a few clicks.
How many backups stored?
To ensure greater security, we keep incremental backups in a safe space for last seven days. These servers’ in turn have RAID 10 disks for more security and speed.
We will help you through this R1Soft Backup tutorial to be able to manage restorations and download the data on hosting accounts available by yourself, so that at any point of time and from your cPanel panel, you can recover your data without our intervention.
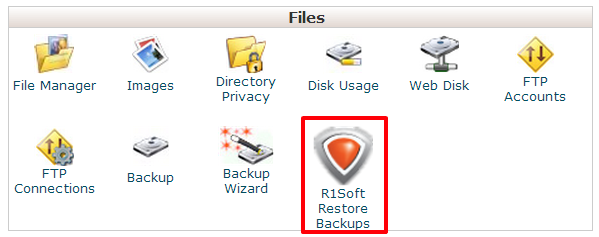
1. Access to the Manager Backup
Follow the instructions below to access the R1Soft Backup Server (hereinafter Backup Manager) through your cPanel control panel:
- cPanel Access: Enter your username and password and click the “Login” button.
- Click on the “R1Soft Restore Backups icon” in the control panel interface. This icon is located in the Files section.
- You will be automatically redirected to the Backup Manager of your account.
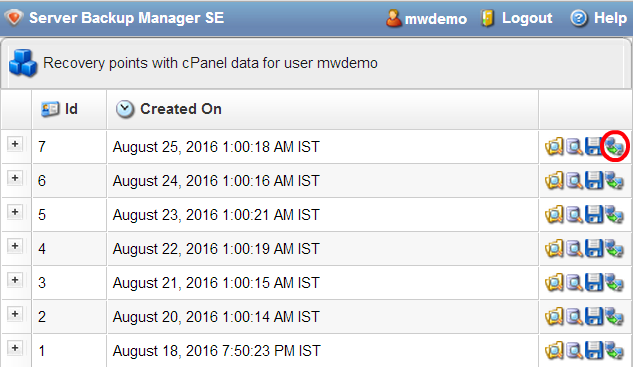
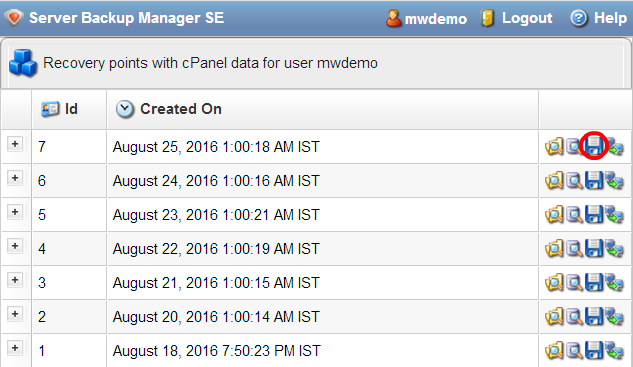
2. R1Soft Backup Restores Manager
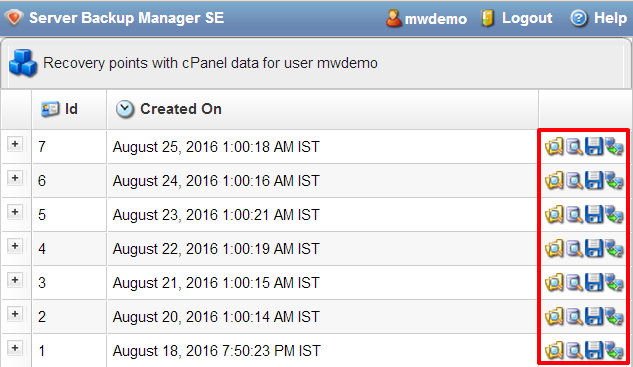
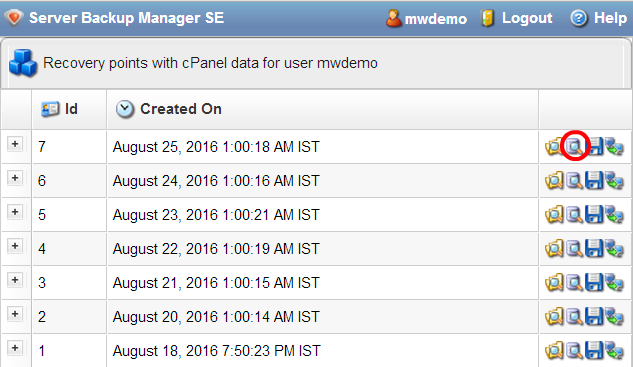
When we first entered the Backup Manager, we are shown a list of recovery points available, detailing the creation date when the copy was generated. These all copies have your details.
At each point of recovery, there is a menu on the right where you can take four main actions:
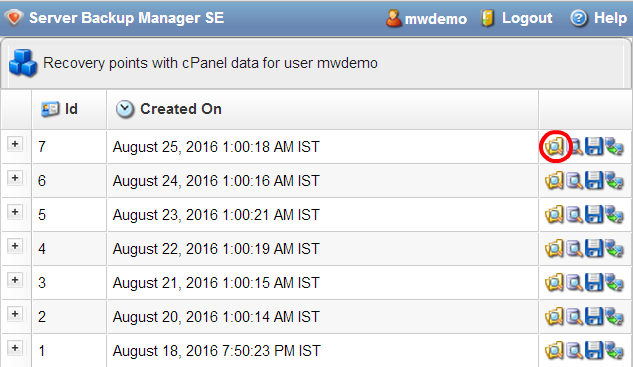
- Browse: We can browse the contents of the selected restore point and choose the files or folders we want to choose to download or restore. Read the next point of this tutorial to see how to download or restore your files or folders from this option.
- Browse Databases: You can browse copies of databases stored on your hosting, with the ability to select the one you want to restore. See Step number 4 of this tutorial for it.
- Download: This wizard will guide you through the steps necessary to download all data from your hosting account. You need to select a type of archive (.zip or .tar.gz). All folders and files will be lowered. See “Download Full Backup on your Local Computer”.
- Send to Agent: This option allows you to restore your account data as a compressed file and store it in the hosting itself (the “directory home” cPanel). See “Download Full Backup Server Home directory”.
3. Download or Restore Files and Folders
If you want to download files, folders or want to restore the data directly on the server (in real web), use this option. To do the restoration, click the “Browse” icon from the action menu.
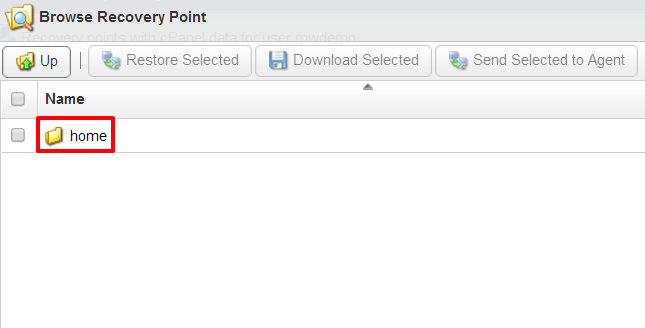
3.1. Navigate through the Home folder
If you want to download or restore a file from the web, enter “home” folder. This folder is the home directory of hosting account and includes inside folders containing your web data, our emails and your cPanel user data, for example.
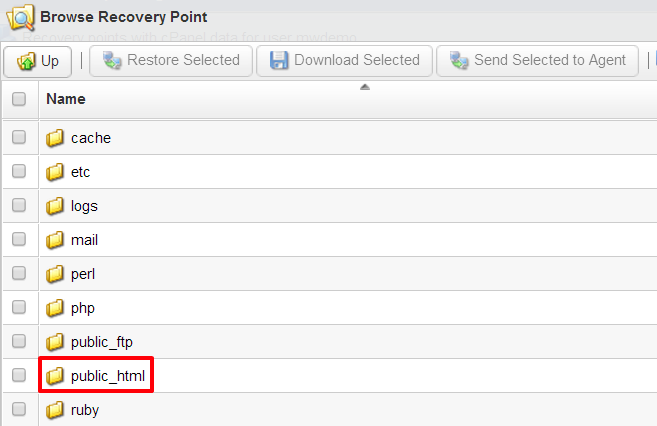
3.2. seek public_html folder
From the list that appears when we walked to the home folder, select the public_html folder. This directory includes files and folders of your Joomla, WordPress, Prestashop, Moodle, etc.
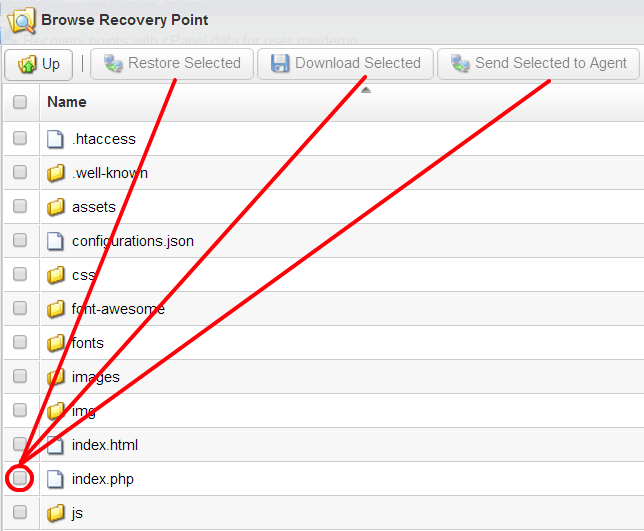
3.3. Select the folder or file you want to restore
In this last step we must choose from the list of files and folders that or those you want to download or restore directly. You can choose as many files and folders as you want. In this example we will restore the “index.php” file of our WordPress.

3.4. Select the action
When selected, the actions menu above will be activated. You can restore selected files and folders directly to your hosting account, download them to the local computer or send compressed to the “home “of your hosting server:
- Restore Selected: Restores the file or folder to its original location on the server, replacing the files or folders you already have. By clicking on this option you will get a confirmation window warning that the target files or folders are replaced.
- Download Selected: Compress the files that you will download a .tar.gz or a .zip. By clicking on this option, the system will show a wizard for you to choose the compression type and a name for the file you’re about to download.
- Send Selected to Agent: The same as the previous option, except that the file or folder does not go down to your computer, it is stored in the “home” folder of your hosting.
3.5. Restore Emails
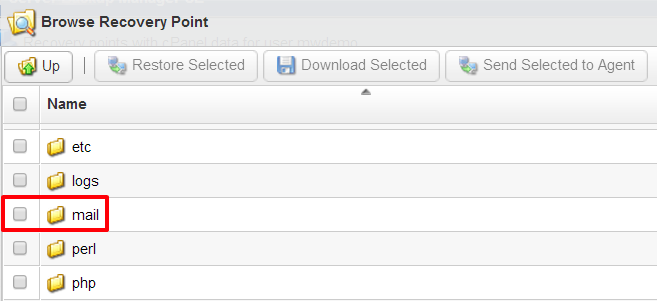
If you lose your emails hosting account or want to recover some lost email for whatever reason, you can do it easily if you restore the “Mail” folder that is inside the “home folder”.
We can recover emails for last 7 days!!
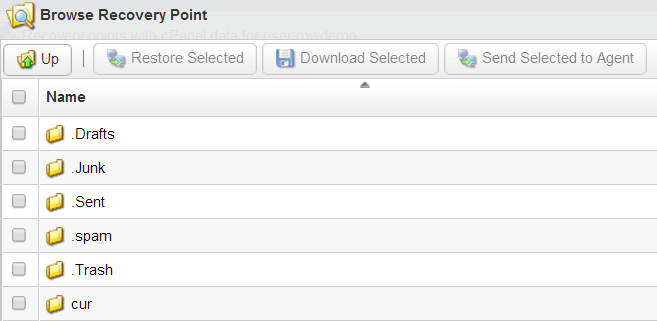
If you want to restore only the emails for particular email account, you will need to enter in the mail folder, select the folder there with your domain name and find within mail accounts divided into subfolders. In turn, within these directories you will see your emails from where you can download or do direct restoration:
- Drafts:
- Junk:
- Sent:
- Trash:
- Cur:
You can also restore all email by selecting the full “mail” folder (not recommended). Contact our support team for this complete restoration.
4. Restore Database from the R1Soft Backup
The data is always saved with R1Soft Backup, plus files and folders on our hosting servers. You can restore the databases of hosting accounts. The databases include all articles, news, users, etc.
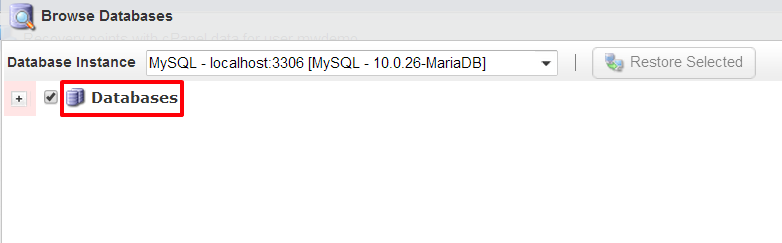
To access the wizard to restore the database, you must click on the following icon on the main screen of the Backup Manager.
4.1. You chose the Database
In this wizard, you choose the name of the database you want to restore. It is important to choose the right name, might have multiple databases in the hosting account and all have a very similar name. Be sure to choose the right one.
You can compare this name in your hosting control panel (cPanel> Databases). If you doubt which database appear in the list, you can check your name in the configuration files of your content manager (wp-config.php, configuration.php, etc) or from the administration itself, in the corresponding section of the site configuration.
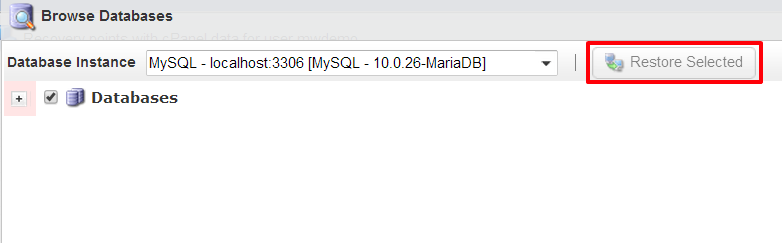
4.2. You restore the database
When you select the database, the action menu is activated, in this case click “Restore Selected” button. In this case you will be shown a confirmation window but the restoration will no more take place. You must be sure to undertake this step as the database of the web in production will be replaced.
NOTE: For now you cannot restore a loose board, we can only restore the database to the full.
4.3. Restore Database to another location
There is another option that is not available from the Backup Manager client and the ability to restore a database to another location. Imagine that you want to restore your database but you do not want to replace it in production on the server but simply want to get some data from any table of that backup. In this case, they could overturn the tables of the database backup to another database of hosting and get the information you want. In this way, you can restore DB1 tables (which is currently published on the web and have actual copy) to a DB2 is in your hosting account but that does not work or have expressly created for this purpose.
To do this, you must contact us by creating a support ticket because it is an action that must be performed by an administrator.
5. Download Full Backup to your local computer
It is the third of the available options. This action lets you download a copy of files or folders to your local computer. It is important to say that in this copy all files and folders included our hosting, including the web, emails, user settings in cPanel, etc. The databases are NOT included in this copy, to lower them follow the steps outlined in paragraph 4 of this tutorial.
5.1. Download Full Copy of R1Soft Backup
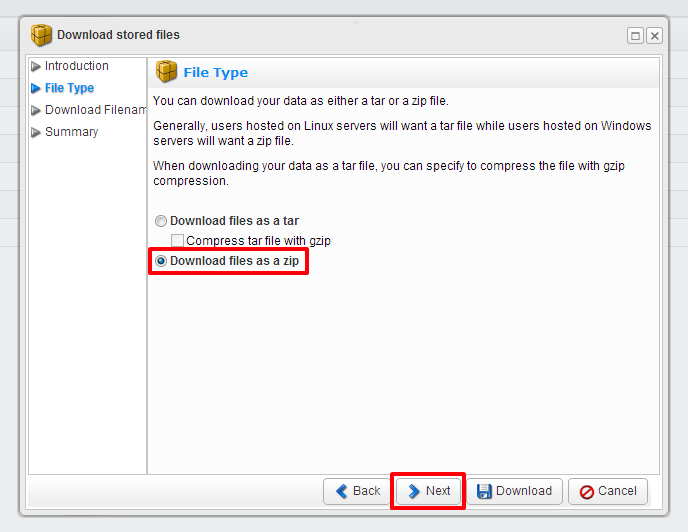
The wizard will display download full copy of R1Soft Backup. This wizard consists of 4 main steps:
The first mode “Introduction”. You can click on “Next” (recommended) to skip to step 2 or download the copy with the default values directly. (See Figure 1)
The second step, “File Type” will allow you to choose between two types of compression (.tar.gz and .zip). Choose .zip for greater compatibility with your computer when unzip. (See Figure 2)
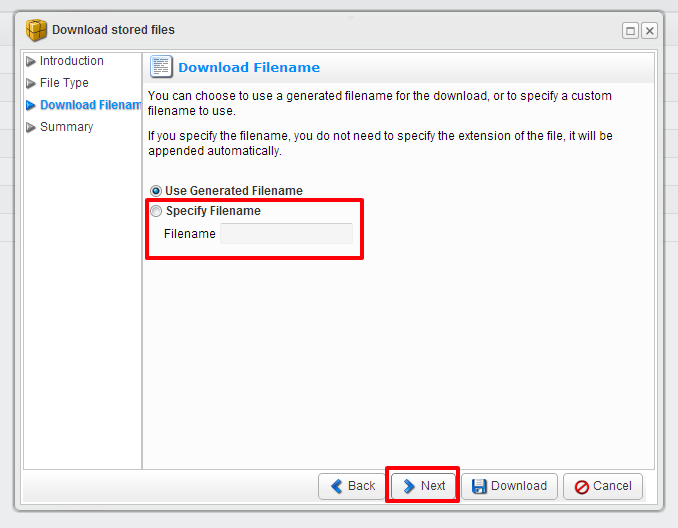
The third step “Download File Name”, where you can choose the name of the compressed file will download to your computer. (See Figure 3)
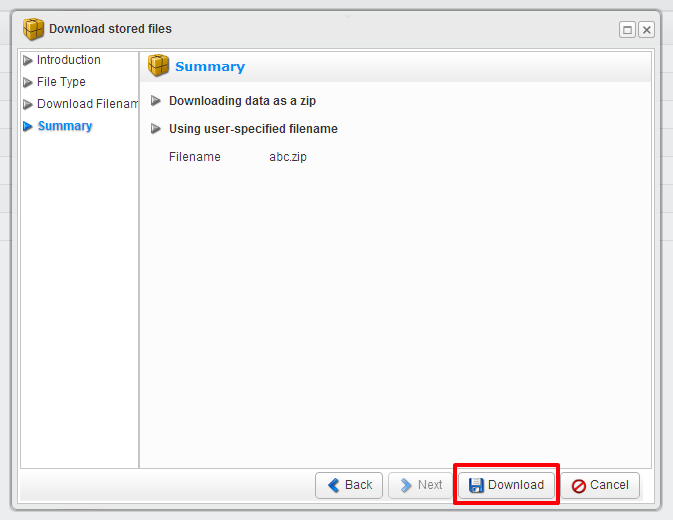
In a last step, “Summary”, which will show a short summary of all the above steps and allows you to finally download the file. (See Figure 4)

6. Download Full Backup Server Home directory
As explained above, you can restore a full backup of all your files and folders (not including databases) to your own hosting server without having to download it to our local computer. It is the fourth option that shows the main screen of the R1Soft Backup Manager: is the “option Send to Agent “.
The steps to place the copy in the “home directory” of your hosting account are exactly the same as we detailed in the previous step, the only difference is that, the compressed file will not be downloaded to your local computer but will be available in the “home” of your hosting directory.